

The Upwork API has several endpoints that can be used to search freelancers, manage jobs and messages, and get reports. Most of the functionality for the web UI for both freelancers and clients is available in the API. Note: You cannot create accounts or manage account settings from the API.
You can find Upwork’s API resource at developers.upwork.com. The developer portal shows instructions for Python, Go, Ruby, PHP, Java, Node, and PERL, but there are no instructions for .NET. The output shown in the examples are often incorrect, so it seems that it has not been updated recently. However, Upwork follows OAuth v2 standards, and this tutorial will show you how to use OAuth in a web application to get permission from a user to run commands on an account.
OAuth v2 is a standard for requesting access to a user account. After you’re granted access to the account, you continue to request an access token for each request. You can keep this access token in a cookie so that you do not need to make a call to the API for every request. If you’ve ever given permission to a third-party application to your Google or Facebook account, you’ve worked with OAuth before. Slack has a good image that explains the general workflow for OAuth.

Getting Access Keys to the Upwork API
Before you can make calls to the API, you need access keys. You need an active, verified freelancer account for your keys to be approved. All key requests are reviewed by Upwork and disabled by default. Upwork’s instructions say that a review is done within 24 hours, but I had to post on Upwork’s official forum to ask for a review after 48 hours of not hearing back from them.
To request Upwork API keys, click here. For this tutorial, a web app using OAuth v2 will be used.
To review the status of your keys, click here.
Note: Always keep your keys in a safe location and never disclose them to a third-party. If someone gains access to your keys, they can make requests under your account. Abuse of your keys could lead to them being disabled. Think of API access keys as the credentials to your account, so you should never give them to a third-party. Remember to remove the keys from your source code if you upload your app codebase to a public server such as GitHub.
After you get your keys and the status shows “Active” on the Upwork API status page, you are ready to create your app. This tutorial is only the authentication and authorization step in an application, which you must create first to successfully make your first call to the Upwork API.
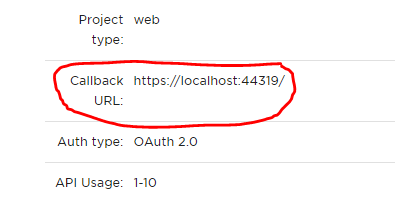
To make calls to the API URL easier, I created a static Constants class to hold the API keys, base URL and the callback (redirect) URL. The redirect URL must match the callback URL configured at Upwork. You can change this URL after the key has been approved, so don’t worry about needing to use a production URL during development. Return to the API key status page and edit the “Callback URL” in the key settings if you need to change it. For this tutorial, the redirect URL is my localhost since I’m still in development. This URL is where Upwork sends the user after they have granted your app access to their account.
The Constants class contains information I use frequently throughout the application codebase. It’s static so that I do not need to instantiate it.
using System;
using System.Collections.Generic;
using System.Text;

namespace Upwork.NET
{
    static public class Constants
    {
        public static string CLIENT_KEY = "YOUR CLIENT KEY";
        public static string CLIENT_SECRET = "YOUR SECRET KEY";

        public static string BASE_URL = "https://www.upwork.com";
        public static string REDIRECT_URL = "https://localhost:44319/";
        public static string USER_AGENT = "My Sample C# App";
        public static string REQUEST_TYPE = "token";
    }
}
The Authorization Class
The next step is to create an authorization class where an Authorize method will make the call to Upwork’s API using the constants defined in the Constants class. Below is the full Authorization class.
using System;
using System.Security.Cryptography;
using System.Net.Http;

namespace Upwork.NET.Oauthv2
{
    /// <summary>
    /// Send an authorization request. Upwork requires a GET request for authorization.
    /// </summary>
    public static class Authorization
    {
        private static string _requestAuthUrl = "/ab/account-security/oauth2/authorize";
        private static string _responseType = Constants.REQUEST_TYPE; //token gets an access_token directly. code gets authorization code, which then is used to get an access_token
        private static string _accessToken = string.Empty;

        public static string Authorize ()
        {

            string fullUrl = Constants.BASE_URL + _requestAuthUrl + "?response_type=" + _responseType + "&client_id=" + Constants.CLIENT_KEY + "&redirect_uri=" + Constants.REDIRECT_URL;

            //redirect user to grant permission
            return fullUrl;
        }
    }
}
When the Authorize method is called in your code, a URL is created. This URL will be used to send the user to the official Upwork domain where they will grant your app permission to their account. Your client key is used to tell Upwork that the request is linked to your access keys. Note that the client key is used and not the secret key. The secret key should never be visible to a third party.
The user will be asked to log into Upwork and then grant your app permission. If the user declines, you will not receive an access code. If the user grants permissions to your application, you receive an access token. Because this is a web app and I’m just in development, I created an MVC application in Visual Studio and used the HomeController to make calls to the Authorization class. I used the following HomeController method to call the authorization method and then redirect the user to ask for permission.
private void GetAccessTokenFromApi ()
{
    string authUrl = Authorization.Authorize();
    Response.Redirect(authUrl);
}
Storing the Access Code in a Cookie
When Upwork sends the access code back to your application, it’s place in a URL fragment. A URL fragment is prefixed with the # character. The URL looks like the following:
https://localhost:3453#access_token=abcdefghijklmnopqrstuvwxyz&expires_in=86399
The fragment is indicated by the # character, and any query string values listed after the # character is not sent to the backend server. Because of this, you can’t get the access token on the backend code. Instead, you must use JavaScript on your site to retrieve the token and store it in a cookie. You can also store the access token in local storage, but make sure you know the difference between local storage and cookies when you retrieve data from these locations. Cookies are always sent to the server, so you can use the cookie to retrieve an access token in your C# backend code.
In my developer solution, I used index.html to retrieve the cookie. My callback URL lands on the index page, and from there you can retrieve the access token and store it in a cookie using JavaScript. The following JavaScript will retrieve the token and place it in a cookie:
<script>
    if (location.hash) {
    var token = location.hash.substring(1);
    if (token !== "") {
        var querystringValues = token.split("&");
        var access_token_pair = querystringValues[0].split("=");
        var expires_pair = querystringValues[1].split("=");
        var access_token = access_token_pair[1];
        var expires = expires_pair[1];

        //create a cookie
        var expiresDate = new Date();
        expiresDate.setHours(expiresDate.getHours() + 23);
        document.cookie = "access_token=" + access_token + "; expires=" + expiresDate + ";";
        document.getElementById("access_token").innerHTML = access_token;
        document.getElementById("expires").innerHTML = expiresDate;

     }
    }

</script>
Note that included in the query string returned by Upwork is the “expires_in” value. This value is the amount of time the access token will remain valid in seconds. The 86399 value calculates to 24 hours, so an access token will remain valid for a day before you must retrieve a new one. When you code your Upwork API applications, you must check that the cookie is valid before using it. If it is not valid, you call the Authorize method again.
After you get authorization from the user, you no longer send them to Upwork to reverify unless the user revokes access from your app. Any subsequent calls for an access token will be invisible to the user.
Making a Call to the Upwork API Using the Access Token
Now that you have an access token, you can make a request from the Upwork API. A quick and easy API endpoint is the authenticated user endpoint. This endpoint returns data from the currently authenticated user, which will be the user who gave your application authorized permission. The following two methods are used to make a call to the API.
public void CallApi(string accessToken)
{
string fullUrl = Constants.BASE_URL + _requestUrl;
var apiCallResult = CallApi(fullUrl, accessToken);
JObject result = JObject.Parse(apiCallResult.Result);
return;
}
private static async Task<string> CallApi(string fullUrl, string accessToken)
{
ServicePointManager.SecurityProtocol = SecurityProtocolType.Tls13 | SecurityProtocolType.Tls12 | SecurityProtocolType.Tls11 | SecurityProtocolType.Tls;
_client.DefaultRequestHeaders.Add("UserAgent", Constants.USER_AGENT);
_client.DefaultRequestHeaders.Authorization = new AuthenticationHeaderValue("Bearer", accessToken);
var response = _client.GetStringAsync(fullUrl);
return await response;
}
If you are successful, the JObject result variable will contain the JSON values returned by the API. What you do with this information depends on your app, but after this tutorial you should be able to retrieve and parse data from the Upwork API using C#.
How do you apply for OAuth v2 here https://www.upwork.com/services/api/apply ?
(it only allows OAuth 1.0)
On the OAuth dropdown there should be a v2 on there. I see it.
very nice